Monday, October 29, 2012

Scrapbook Furniture

Let me explain.  I have mentioned before that I have been actively involved in dogs and dog sports for a long time.  Over all that time I accumulated lots of photos of the dogs.  Lots and lots of photos.  I had stacks of them, and somehow I just knew that I would never scrapbook them.  These photos were special though, like most photos are, and in many ways these photos document my life as well as the dogs.  So, one day I had this great idea.
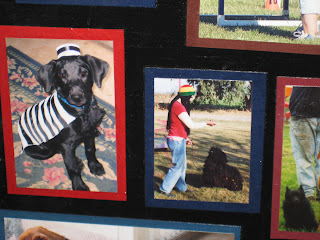
I had purchased a piece of junk dresser/desk at a fund raiser sale.   With a few repairs, some black paint, and some mounted photos, I transformed it into one of my favorite things.


I started by cropping the photos.  I cropped with intent, and then I mounted each photo on colored card stock.  Then the real fun started when I took a handful of mounted photos and started arranging them on the dresser.  I did one drawer at a time, just moving photos around until they fit in an orderly fashion.
Then I used Mod Podge to attach them to the dresser forever.  It was easy, fun, and now I can see my dogs through the years all on a piece of furniture.
Here are several shots of the photos on the dresser just so you can see the variety of sizes, how I puzzled them together, and you will get a good view of my life with my dogs.


Sadly, many of the dogs displayed on this dresser have passed, but I am thankful for the time I had with each one of them, and I love my scrapbook dresser.  Thanks for looking, and I hope you enjoyed it.
Esther

Friday, October 26, 2012

Bloggers Quilt Festival "David's Ties"

I am entering the Bloggers Quilt Festival this fall with my quilt made from David's Ties.


There is quite a story with this quilt, and I will do my best to tell it well.  David was my brother's partner for over thirty years, and this quilt is made from his ties.  David was a pulmonary specialist, and an accomplished cello player, just to highlight a few of his passions.  

These ties were beautiful, and I wanted to show them off as much as I could.  I designed a template that would use the wide end of the tie, keeping the tie shape, and working around that.


To prepare the ties, I opened them up, and then ironed featherweight interfacing to the wrong side.  This step was genius if I do say so myself, because it allowed me to cut and work with the silk, bias cut fabric without distortion.
The setting squares were made from a two inch square of fabric from my brother's bow ties.  I used raw silk for the sashing and love how nicely it complimented the shiny silk in the ties.


I used a feather plume design that I learned from Angela Walters, to highlight the larger pieces.  Each block was sixteen inches square.

I used silk radiance for the back, and it is beautiful.  The batting is wool which gave a nice loft and definition to the quilting.

As I deconstructed the ties, I saved all the labels and sewed them to the hanging sleeve.

This tie is so full of memories for my brother, and has helped him heal.  The quilt is a tribute to David, and something that my brother can hold, look at and remember.  Each tie tells a story, and now the quilt brings a new beginning to an ending.

So that is the story of David's Ties.  Thanks for looking.

This quilt is 70"x70"

Designed, pieced and quilted by me, Esther

Bed quilt
Art quilt
Scrap quilt

Thursday, October 25, 2012

Harvest party and a birthday

My Holly Jolly turned one.  I took a plain little shirt, and with some applique and crystals, I made her a special birthday outfit.


In the background you can see family cheering for the Giants in the World Series.
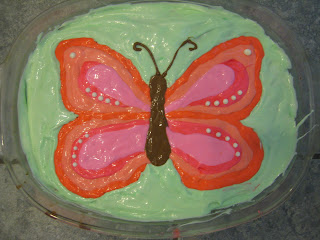
I also made her a special cake, inspired by her invitation.


Happy first birthday dear Holly.

And, besides birthday parties, my daughters organized our first annual Harvest Party.  This year it consisted mostly of several little children decorating pumpkins.  Everyone had fun, a great dinner followed, and a tradition was started.


Happy Autumn to everyone, thanks for looking, I know I say it a lot, but I honestly do appreciate you stopping by.  You are a connection I have come to depend on, and a support I now need.  I thank you.

Esther

Sunday, October 21, 2012

When life hits hard

My mother in law fell Friday night, broke her hip and had surgery Saturday.  So far all is going well, but there is still a long way to go.  She is in her nineties so everything is difficult, and a fall and surgery just add to the list.  My husband is the worlds best son, and if his strength can heal, she will recover soon.  I don't want to get too wordy here, I am sure there are times in your life you can all relate this post to, some times things are just hard.  We are there now.

Thanks for letting me share, I appreciate it.

Esther

Thursday, October 18, 2012

Design board and Celtic progress

First off, I am making great progress on the Celtic Knot quilt, and I am still enjoying working on it.

This is part of the first two rows on my newly made design board.  I love seeing how the three cords are winding their way through each other and making a pattern on the quilt.  The little white blobs on the corners of the blocks are my identifying numbers just to keep everything straight.  All in all I have had very few problems putting this together.

And, it is so nice to have a design board.  I honestly don't do a lot of "design" work with my quilting, so I never thought about the advantages of having a place to lay out your quilt, or at least a portion of your quilt.  It is wonderful, and really boosts my enthusiasm to see it all coming together.

My design board was super easy to make, and really inexpensive.  Both good things.  I bought a 4x8 piece of foam insulation from Home Depot.  There are several types of insulation boards, most being 4x8 and ranging in price depending on the thickness.  I bought the thinnest and cheapest on I could find, less than $6.00.  I know, really cheap.  The most difficult part of this whole process was getting the 4x8 piece of foam board home.  I have a full size van, but the way I have the seats configured it was a tight fit.  I ended up slightly bending, (a gentle curve) to get it to fit in my van.


Once home I used a razor blade knife and cut the size that would fit my wall.  Then I cut a piece of cotton batting and used Duct tape to secure it to the board.  Not very fancy, but it works well.

Thanks for visiting, I appreciate it,  Esther

Tuesday, October 16, 2012

Holly lost her Jolly

My grand daughter's name is Holly, but we always call her Holly Jolly.  The name is perfect for her because she is such an easy going little girl.  She always has been and we have always called her Holly Jolly.  Even her brother and her playmates call her Holly Jolly.

Well, today Holly lost her Jolly.  Don't know why or how, but all her Jolly was gone.  Long day for an unhappy baby, and her G-ma.  The funniest part of Holly loosing her Jolly was when her brother Ethan started looking for it.  He has a wonderful imagination, and has been doing a lot of pretend play lately.  Today he actively looked for Holly's Jolly.  And, he found it.  It was hiding by the elliptical machine, and it took two hands to carry it back and dump it on Holly's high chair tray.  Too funny.

I feel very thankful for my days with my grand babies, even those days that are longer than others.  My heart is very full.  Thanks for joining me even on the not so Jolly days, I appreciate it.

Esther

Sunday, October 14, 2012

Photos from the quilt show

The Pacific International Quilt Show (PIQF) was amazing again this year.   I had a great time wandering through the show with my friend Liz.  She is a FMQ also, so we had a lot of fun critiquing the quilts together, and sharing our ideas with each other.  We generally had the same compliments and complaints on the quilts we saw, and we were able to gain new insight because we could bounce our ideas off each other, and point out things to each other that we may have missed individually.

So, here are a few pictures, mostly close ups of quilting detail.  In my quest to take photos, and see as many of the quilts as possible, I did not document the makers of the quilts.  For that I apologize, and I mean no disrespect of these talented artists.  I just did not take the time to get that information.
 The quilter used quilting to highlight the gold shapes in the fabric.  Beautiful effect.  What impressed me was how tiny and dense her quilting was.
More detail from the same quilt.

Such a random subject for a quilt, two huge hippos.  This quilt was large, and I thought it totally worked.  Close ups show how the quilting added so much to the quilt.
The quilting was fun and whimsical, and softens the forcefulness of the hippos.
Detail of the hippo ears.
This free form flower shape was on the body of the hippos.
 This quilt was actually six different panels, made by six different quilters.  
Each panel had different fabrics and quilting detail, but they all came together beautifully.

That's all the quilting photos for today, but I do have one other photo of my little puli Harry Potter.  He had some surgery and has to wear a cone.  Poor little guy, but he is doing well.  The collar he is wearing is black, he is a black dog, and I am not much of a photographer, but you will get the idea.  There is a reflective band on the collar that looks illuminated in the photo.
Harry Potter resting (pouting) in his collar.  

Thanks for visiting and I appreciate it.

Esther

Thursday, October 11, 2012

A pieced top, and a quilt show

I have been working my way through my UFO list, and am happy to have this top pieced.

I am liking this quilt now that it is together, but I did not enjoy piecing it.  I am often a sucker for pre-cuts, and this was the result of a pre-cut purchase.  

The quilt was assembled row by row, (I think that is the name of the pattern) and for me, it just wasn't fun.  Anyway, it is finished, at least pieced, and I am glad about that.

I am going to the PIQF.  Big quilt show in the Bay Area, and I look forward to this trip every year.  I have plans to visit my brother, and then I'm meeting up with a friend to hit the show.  The PIQF is the first large quilt show I ever went to, and it is still special for me.

Enjoy your weekend, I appreciate you stopping by.

Esther

Tuesday, October 9, 2012

Once a year

Once  year I take fresh Fuji apples


and a bag of Carmels

and some chocolate

add in some toasted almonds


and I make Chocolate Covered Caramel Apples.  Oh Yea!

These things are just over the moon good.  The addition of the toasted almonds and the chocolate put an ordinary caramel apple on another level.  So, so good.

And, once a year I live through harvest.  We live with almond orchards on three sides of our property.  This season every year the farmers harvest their almonds.  What this means to me is dust, well really it is dirt.  Lots and lots of dirt.

The haze you see here is not smoke or fog, but dirt stirred up by the harvest equipment.

This dirt seems endless, and in reality for about six to eight weeks every year it is endless.  It just hangs in the air, on the cars, sidewalks, trees, and oh yes, in my house.  There is a difference between dust and dirt, and while I try to keep both in check, the dirt caused by harvest just about has me done in for this season.  I am ready for it to rain, settle the dust, and clean everything off.

But, enough about harvest and dirt, let's get back to the Chocolate covered Caramel Apples.
If you are so inclined to make them, here are a few tips I have learned over the years.

First off, wash the apples.  Not just wash them, but drop them in a pot of simmering (low boiling) water for a few seconds.  Sounds crazy, but there is often a wax coating they put on produce that will make the caramel not stick well to the apples.

Another good idea is do not poke a stick into the apples.  This keeps the juice in, and other stuff out of the apple.  Along with this tip, don't cover the entire apple in caramel, but leave a small bit of apple uncovered.  I'm not sure why this is important, but I read it somewhere, and it seems to work well.

I like the Kraft caramels, and while I often buy out of the bulk bins, and once I even made my own caramel, for taste and ease for me, the Kraft Caramels are the best for apples.  Maybe because it is what I grew up with.  I melt the caramel in the microwave, just until it is melted and I can stir it easily.  It is maybe too thick to actually dip the apples into, and really without a stick in the apple they are difficult to dip at all.  I spread the caramel on with a spatula, and then set the apples upside down on a wax paper lined tray.
When I have covered all the apples, and they have cooled a bit, I turn them right side up, and put them in the refrigerator while I melt the chocolate.

I treat the chocolate the same way I did the caramel, spread it on with a spatula, and you can expect to get a bit messy here, I haven't figured a way around that yet.  While the chocolate is still melted, roll the whole mess in chopped toasted almonds.  Set on wax paper covered tray, and refrigerate.

Now, just in case you are wondering how in the world you even begin to eat one of these things, I recommend you cut them into wedges.  Much easier to enjoy this way.

If you have never eaten one of these delicious treats, I highly recommend you try one.  

If you do make these let me know, I will share in your pleasure.

I appreciate you checking in.
Esther